Its time for the next tutorial.You should have set up your development environment as shown in the previous post.Its time for the first project.This tutorial will deal with Hello Android which frankly is nothing but creating a project and running it.We will explore the contents of the project in this tutorial.What you require is Eclipse,an emulator and of course the ADT Plugin as described in the previous post.
New Project
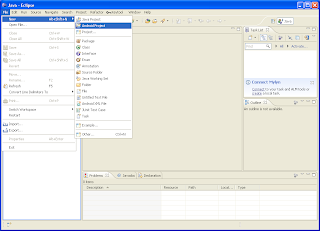
1)We start by making a new project in Eclipse
File > New > Android Project
2) A dialog box will appear as shown below

3) Give your Project a name.(Here Example)
4) Select a Target version representing your target android version.I have selected v1.6 and above as this will make your app available for all above android versions.
5) Eclipse will automatically fill Min-SDK version and application name which you can change.You have to specify a package a name as well.It should be unique and don't use com.android.//something .This will be used to identify and search your application in android market.
6) There is also a field called Activity name.This Activity refers to a class that is going to be set as a launcher activity.Activity is something that a user views as his UI and has the control of UI thread.More on Activity in later posts.
7)Once all this is done you are ready to create your project.Click on Finish to create the Project.
1) Go to Run > Run Configurations
The following dialog will open
 2) Double Click on the Android Application and then the New_configuration
3) Give it a name and give the Project name for Project
 4) Click on Target > select a target from the AVD you created as per the last post.Here donut. Click on Apply and Run to run your project.


1) src : as the name suggests contains your java package and the source code.You can see the
ExampleActivity.java in it.
2) gen: It contains self-generated R.java which holds the references of all the resources like TextView,strings,
drawables,colors,layouts.
3) res: ->drawable(ldpi,mdpi,hdpi)->contains the images you want to use in your app(for different densities)
res: ->layout ->contains the layout in an xml file made of views like textview , buttons etc.
res:->values ->some values you want to be available throughout your app.like strings say your app name
in xml files
The reference for these resources are stored in R.java in gen.
4) AndroidManifest.xml : A very important file which has instructions for your application behaviour and information for Android OS like how many Activities it has?what is the package name?What permissions are required?etc.
Thats the project environment you have.A more realistic app in the next tutorials till then,
Happy Droiding !!
New Project
1)We start by making a new project in Eclipse
File > New > Android Project

2) A dialog box will appear as shown below

3) Give your Project a name.(Here Example)
4) Select a Target version representing your target android version.I have selected v1.6 and above as this will make your app available for all above android versions.
5) Eclipse will automatically fill Min-SDK version and application name which you can change.You have to specify a package a name as well.It should be unique and don't use com.android.//something .This will be used to identify and search your application in android market.
6) There is also a field called Activity name.This Activity refers to a class that is going to be set as a launcher activity.Activity is something that a user views as his UI and has the control of UI thread.More on Activity in later posts.
7)Once all this is done you are ready to create your project.Click on Finish to create the Project.
Setting up running Environment:
In order to run your program on eclipse you will have to setup run/debug configurations.1) Go to Run > Run Configurations
The following dialog will open

3) Give it a name and give the Project name for Project


That's it you successfully completed the Hello Android Project.Did you do anything ? Nothing actually told ya !! :)
Finally just an Overview of what all files were generated in the project:

1) src : as the name suggests contains your java package and the source code.You can see the
ExampleActivity.java in it.
2) gen: It contains self-generated R.java which holds the references of all the resources like TextView,strings,
drawables,colors,layouts.
3) res: ->drawable(ldpi,mdpi,hdpi)->contains the images you want to use in your app(for different densities)
res: ->layout ->contains the layout in an xml file made of views like textview , buttons etc.
res:->values ->some values you want to be available throughout your app.like strings say your app name
in xml files
The reference for these resources are stored in R.java in gen.
4) AndroidManifest.xml : A very important file which has instructions for your application behaviour and information for Android OS like how many Activities it has?what is the package name?What permissions are required?etc.
Thats the project environment you have.A more realistic app in the next tutorials till then,
Happy Droiding !!
hey when i delete the pre-written contents of androidmanifest.xml file nd put some new contents in it, it gives errors...what to do??
ReplyDeleteWhat errors do you get?
ReplyDelete[2011-12-16 20:14:06 - Emulator] PANIC: Could not open: C:\Users\Administrator\.android/avd/android.ini
ReplyDeleteHave you created an AVD?
ReplyDeleteyea there is a file android.ini in the directory.....
ReplyDeleteCheck out this link:
ReplyDeletehttp://stackoverflow.com/questions/6641498/android-emulator-cant-start-cause-of-wrong-folder